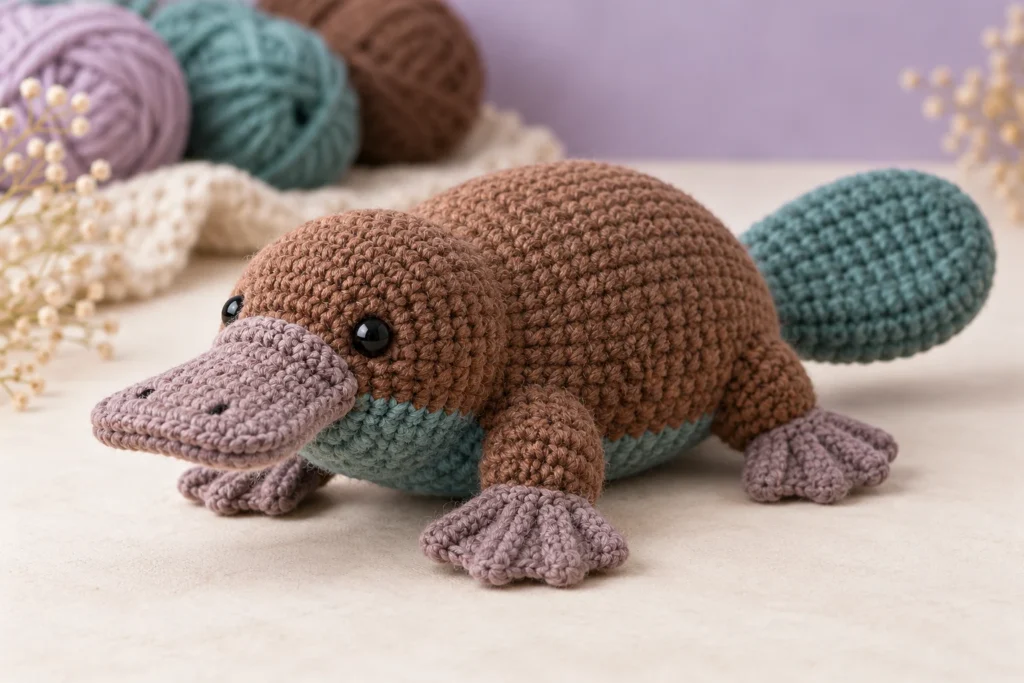
This original pattern makes a plump little platypus with a low bill, four paddle feet, and a broad tail. The shapes use single crochet, increases, and invisible decreases, making the design approachable for a confident beginner.
Commercial disclosure: This article contains no affiliate links or sponsored recommendations.
In this pattern
- Project snapshot
- Materials and tools
- Abbreviations and special stitches
- Body, bill, feet, and tail instructions
- Assembly and finishing
- Troubleshooting and customization
Project snapshot
| Detail | Pattern overview |
|---|---|
| Skill level | Beginner |
| Crochet terms | US |
| Construction | Body worked in continuous rounds; flat pieces sewn on |
| Sewing | Moderate: five pieces plus facial details |
| Yarn | Medium-weight yarn in body, bill/feet, and accent colors |
| Finished size | Varies by yarn, hook, stuffing, and personal tension |
| Time and yardage | Vary with yarn choice and crocheting pace |
Before you begin
Work the body and other round pieces in a spiral unless a section says otherwise. Place a removable marker in the first stitch and move it after every round. Stuff gradually and keep the fabric firm enough that filling does not show through.
The bill and tail are each made from two matching flat panels. This gives both pieces a tidy edge and leaves room for a very light layer of stuffing.
Abbreviations
- ch: chain
- sc: single crochet
- inc: work 2 sc in the same stitch
- dec: invisible single crochet decrease over the next 2 stitches
- sl st: slip stitch
- st(s): stitch(es)
- Rnd: round
- Row: row
- FO: fasten off
- MR: magic ring
Numbers in parentheses show the stitch count at the end of a round or row. Instructions inside parentheses followed by x are repeated the stated number of times.
Special stitches
Invisible decrease: Insert the hook under the front loop of each of the next two stitches. Yarn over and pull through the two front loops, then yarn over and pull through both loops on the hook.
Crocheting panels together: Hold two matching panels with wrong sides together. Insert the hook through both layers and work one sc through both corresponding edge stitches. For this pattern, sewing with a whipstitch is an equally suitable beginner option.
Materials and tools
- Medium (4) yarn in a body color such as cocoa, gray, or teal
- Medium (4) yarn in a contrasting bill-and-feet color
- A small amount of a darker accent color for the tail, if desired
- 3.25 mm (D-3) crochet hook; adjust after sample testing if gaps appear
- Polyester fiberfill
- Locking stitch marker
- Yarn needle
- Scissors
- Black embroidery yarn for eyes and nostrils
- Optional pair of safety eyes, size to be selected during sample testing
Exact yarn quantities and the final eye size must be recorded from the physical sample before this pattern is promoted as tested.
Instructions
Body
With the body color:
- Rnd 1: Work 6 sc in an MR. (6)
- Rnd 2: Inc in each st around. (12)
- Rnd 3:
(sc, inc)x 6. (18) - Rnd 4:
(2 sc, inc)x 6. (24) - Rnd 5:
(3 sc, inc)x 6. (30) - Rnd 6:
(4 sc, inc)x 6. (36) - Rnds 7–15: Sc in each st around. (36 each round)
- Rnd 16:
(4 sc, dec)x 6. (30) - Rnd 17:
(3 sc, dec)x 6. (24)
If using safety eyes, provisional placement is between Rnds 7 and 8, about 7 stitches apart. Confirm their final position on the sample before this pattern is promoted as tested. Embroidered eyes can be added after stuffing.
- Rnd 18:
(2 sc, dec)x 6. (18) - Stuff the body, shaping it into a low oval rather than a sphere.
- Rnd 19:
(sc, dec)x 6. (12) - Add more stuffing without stretching the stitches.
- Rnd 20: Dec x 6. (6)
FO, leaving a tail. Thread the tail through the front loops of the final 6 stitches, pull closed, and secure.
Bill panels (make 2)
With the bill color, ch 6.
- Rnd 1: Starting in the second ch from the hook, sc in the next 4 ch, work 3 sc in the last ch, rotate to work along the unused loops on the opposite side of the foundation chain, sc in the next 3 ch, then inc in the last ch. (12)
- Rnd 2: Inc, 3 sc, inc in each of the next 3 sts, 3 sc, inc in each of the final 2 sts. (18)
- Rnd 3:
(sc, inc), 3 sc,(sc, inc)x 3, 3 sc,(sc, inc)x 2. (24)
Sl st in the next st and FO. Leave a long sewing tail on one panel.
Hold the panels together. Sew or crochet through both layers around the edge, adding only a whisper of stuffing before closing. Embroider two small nostrils near the rounded outer edge.
Paddle feet (make 4)
With the bill-and-feet color, ch 5.
- Row 1: Starting in the second ch from the hook, sc across. Ch 1, turn. (4)
- Row 2: Inc, sc in the next 2 sts, inc. Ch 1, turn. (6)
- Rows 3–4: Sc across. Ch 1, turn after Row 3 only. (6 each row)
- Row 5: Dec, sc in the next 2 sts, dec. (4)
FO, leaving a long tail. Do not stuff. For an optional toe suggestion, embroider two short straight lines from the outer edge toward the center after assembly.
Tail panels (make 2)
With the accent or body color, ch 6.
- Rnd 1: Starting in the second ch from the hook, sc in the next 4 ch, work 3 sc in the last ch, rotate to work along the opposite side, sc in the next 3 ch, then inc in the last ch. (12)
- Rnd 2: Inc, 3 sc, inc in each of the next 3 sts, 3 sc, inc in each of the final 2 sts. (18)
- Rnd 3:
(sc, inc), 3 sc,(sc, inc)x 3, 3 sc,(sc, inc)x 2. (24) - Rnd 4: Sc in each st around. (24)
Sl st in the next st and FO. Leave a long sewing tail on one panel. Hold the panels together and join around the edge, placing a very thin layer of stuffing inside before closing.
Assembly and finishing
Pin every piece before sewing and evaluate the placement from the front, side, and top.
- Center the bill across the front of the body, provisionally spanning Rnds 8–12. Sew all the way around its inner edge.
- Add embroidered eyes above the bill if safety eyes were not used. Keep both eyes level with the same body round.
- Pin the front feet low on the body near Rnds 14–17 and the back feet near Rnds 16–19. Angle the broad edges slightly outward, then sew securely.
- Center the narrow end of the tail over the closing end of the body and sew it across Rnds 15–18. Let the tail extend flat behind the platypus.
- Weave all yarn tails through several stitches before trimming.
The exact round placements are provisional and must be confirmed on the crocheted sample.
Troubleshooting and finishing
If the body has visible gaps
Try a smaller hook before adding more stuffing. The correct adjustment depends on the chosen yarn and must be confirmed during testing.
If the bill curls
Make sure both panels have the same 24-stitch final count. Block acrylic yarn with care and avoid direct high heat. A light layer of stuffing should be enough to keep the bill flat.
If the platypus tips forward
Reduce the bill stuffing and move the tail attachment slightly lower. Do not add pellets or weights to a child’s toy.
Customization ideas
- Use a darker tail to suggest the platypus’s natural color blocking.
- Embroider sleepy eyes for a nursery-friendly expression.
- Add surface-embroidered ripples or dots to the tail rather than attaching beads.
- Make a tiny scarf as a removable display accessory; remove it before giving the toy to a young child.
Safety and care
Embroidered facial features are the safer choice for children under three. Plastic eyes, buttons, beads, weights, wire, and removable accessories can become choking or injury hazards. Check seams regularly, supervise play, and follow the care instructions for the yarn and filling actually used in the tested sample.
Keep making
Suggested internal links to add when the corresponding articles are live:
- How to Crochet a Magic Ring
- How to Stuff Amigurumi Smoothly
- Beginner Moonbeam Bunny Amigurumi Pattern
- From Yarn to Meow: Crocheting Your Own Cute Cat
This is an original Amigurumi Magic pattern written for personal use. The copyright notice applies to this original text, photographs, illustrations, and the particular arrangement of this design; it does not claim ownership of standard crochet stitches or techniques. Do not reproduce, sell, translate, or redistribute the pattern itself without written permission. Permission terms for selling handmade finished items will be finalized before this pattern is promoted as tested.
Report a suspected error through the Contact page so the correction date can be recorded.