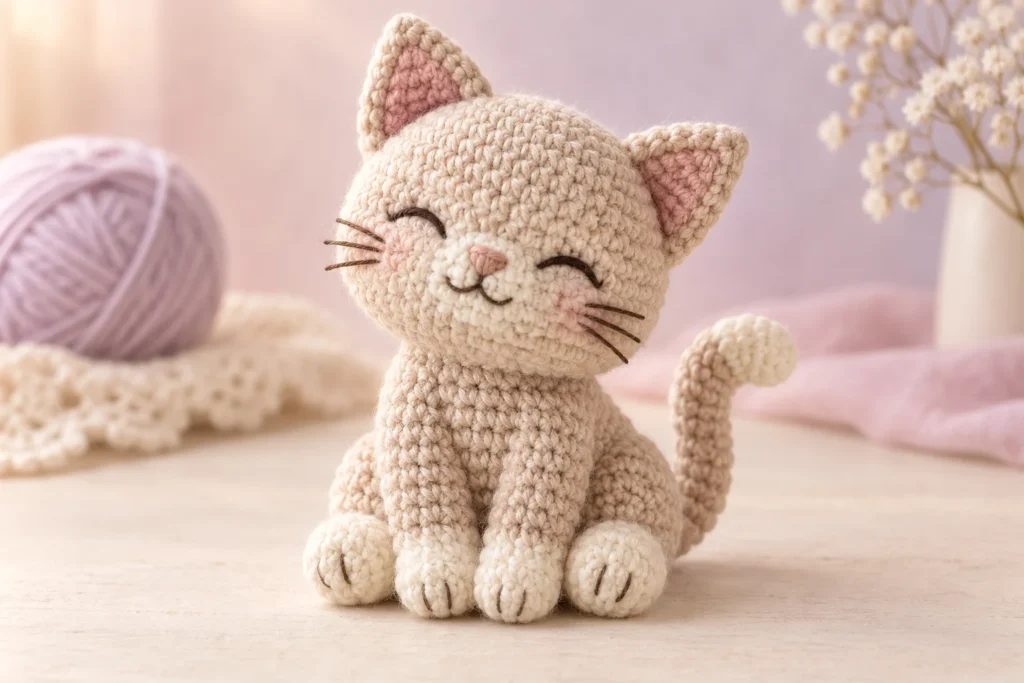
Turn a few soft yarn shapes into a small seated cat with alert ears, a gentle muzzle, and a curling tail. The head and body are worked as one piece, so there is no neck seam to align. This pattern is written for beginners who are comfortable working in continuous rounds.
Commercial disclosure: This article contains no affiliate links or sponsored recommendations.
In this pattern
- Project snapshot
- Materials and tools
- Abbreviations and construction notes
- Head and body instructions
- Ears, muzzle, paws, arms, and tail
- Assembly, troubleshooting, and variations
Project snapshot
| Detail | Pattern overview |
|---|---|
| Skill level | Beginner |
| Crochet terms | US |
| Construction | One-piece head and body with sewn features and limbs |
| Sewing | Moderate |
| Yarn | Medium-weight yarn in main and muzzle colors |
| Finished size | Varies by yarn, hook, stuffing, and personal tension |
| Time and yardage | Vary with yarn choice and crocheting pace |
Before you begin
Unless stated otherwise, crochet in continuous spiral rounds. Mark the first stitch of every round. The cat begins at the crown of the head, narrows at the neck, expands into the body, and closes at the base.
For the cleanest face, embroider the eyes, nose, and mouth after the muzzle has been attached. If safety eyes are chosen for a display piece, insert them before the head opening becomes too small.
Abbreviations
- ch: chain
- sc: single crochet
- hdc: half double crochet
- inc: 2 sc in the same stitch
- dec: invisible single crochet decrease over the next 2 stitches
- sl st: slip stitch
- st(s): stitch(es)
- Rnd: round
- Row: row
- FO: fasten off
- MR: magic ring
Special stitches
Invisible decrease: Insert the hook under the front loops of the next 2 stitches. Yarn over and pull through both front loops, then yarn over and pull through both loops on the hook.
Standing hdc: With a slip knot on the hook, yarn over, insert the hook in the indicated stitch, yarn over and pull up a loop, then yarn over and pull through all 3 loops. A regular joined hdc may be substituted.
Materials and tools
- Medium (4) yarn in the main cat color
- Medium (4) yarn in a muzzle color
- Small amounts of pink and black embroidery yarn
- 3.25 mm (D-3) crochet hook; hook choice is provisional until the fabric is tested
- Polyester fiberfill
- Locking stitch marker
- Yarn needle and scissors
- Optional safety eyes, final size pending physical sample review
Record actual yarn usage, eye size, and any gauge adjustment from the finished sample before this pattern is promoted as tested.
Instructions
Head and body
With the main color:
- Rnd 1: Work 6 sc in an MR. (6)
- Rnd 2: Inc in each st around. (12)
- Rnd 3:
(sc, inc)x 6. (18) - Rnd 4:
(2 sc, inc)x 6. (24) - Rnd 5:
(3 sc, inc)x 6. (30) - Rnds 6–12: Sc in each st around. (30 each round)
If using safety eyes, provisional placement is between Rnds 8 and 9, 6 stitches apart. Confirm after making the sample.
- Rnd 13:
(3 sc, dec)x 6. (24) - Rnd 14:
(2 sc, dec)x 6. (18) - Stuff the head evenly, leaving the neck area flexible.
- Rnd 15:
(2 sc, inc)x 6. (24) - Rnd 16:
(3 sc, inc)x 6. (30) - Rnds 17–24: Sc in each st around. (30 each round)
- Rnd 25:
(3 sc, dec)x 6. (24) - Rnd 26:
(2 sc, dec)x 6. (18) - Stuff the body, keeping the base broad enough for a seated pose.
- Rnd 27:
(sc, dec)x 6. (12) - Rnd 28: Dec x 6. (6)
FO, leaving a tail. Draw the final 6 front loops closed and secure.
Ears (make 2)
Worked in turned rows with the main color. Ch 2.
- Row 1: Work 2 sc in the second ch from the hook. Ch 1, turn. (2)
- Row 2: Inc in each st. Ch 1, turn. (4)
- Row 3: Inc, sc in the next 2 sts, inc. Ch 1, turn. (6)
- Row 4: Sc across. (6)
FO, leaving a long sewing tail. The foundation edge forms the ear tip; the final row forms the base. Optional: embroider a small inner-ear triangle without pulling the fabric tight.
Muzzle
With the muzzle color:
- Rnd 1: Work 6 sc in an MR. (6)
- Rnd 2: Inc in each st around. (12)
- Sl st in the next st and FO, leaving a long tail.
Do not stuff. The circle will be gently stretched into an oval during sewing.
Hind legs (make 2)
With the main color:
- Rnd 1: Work 6 sc in an MR. (6)
- Rnd 2: Inc in each st around. (12)
- Rnd 3:
(sc, inc)x 6. (18) - Rnds 4–5: Sc in each st around. (18 each round)
- Rnd 6:
(sc, dec)x 6. (12) - Rnds 7–8: Sc in each st around. (12 each round)
Lightly stuff the paw end only. Flatten the open edge and work 6 sc through both layers to close. FO with a long sewing tail.
Arms (make 2)
With the main color:
- Rnd 1: Work 6 sc in an MR. (6)
- Rnd 2: Inc in each st around. (12)
- Rnds 3–7: Sc in each st around. (12 each round)
- Rnd 8:
(sc, dec)x 4. (8) - Rnds 9–10: Sc in each st around. (8 each round)
Lightly stuff the lower half. Flatten and work 4 sc through both layers. FO with a long sewing tail.
Tail
With the main color:
- Rnd 1: Work 6 sc in an MR. (6)
- Rnd 2:
(sc, inc)x 3. (9) - Rnds 3–18: Sc in each st around. (9 each round)
Add a very small amount of stuffing as you work, or leave the tail unstuffed for a flatter curl. Do not add wire. Flatten the opening and work 4 sc through both layers, leaving 1 stitch unworked if necessary to keep the seam centered. FO with a long sewing tail.
Assembly and finishing
Use pins to audition the placement before attaching anything. The following rounds are provisional until sample review.
- Pin the ear bases across the top of the head near Rnds 3–6. Curve each base slightly and sew securely.
- Center the muzzle between the eyes, approximately over Rnds 9–12. Sew around its edge without stuffing.
- Embroider a small triangular nose at the top center of the muzzle. Add a short vertical line and two shallow mouth curves.
- For embroidered eyes, place two short vertical or curved stitches level with each other above the muzzle.
- Sew the hind legs to the lower sides of the body near Rnds 22–26 so the broad paws face forward.
- Sew the arms to the sides near Rnds 16–18. Angle them slightly toward the belly.
- Attach the tail at the back near Rnds 22–25. Curve it around one side and tack one point to the body with a removable stitch if the final sample needs extra stability.
- Weave in all ends securely.
Troubleshooting and finishing
If the neck looks pinched
Redistribute a small amount of stuffing between Rnds 13–16 with the blunt end of the hook. Avoid overpacking the narrowest rounds.
If the cat will not sit
Flatten the base by gently shaping the filling. Check that both hind legs are attached at the same height and that the tail is not pushing the body forward.
If the ears flop
Use a slightly smaller hook for the ear panels or add a second matching panel to each ear during the tested revision. Do not insert wire into a child’s toy.
Customization ideas
- Change colors at the start of selected rounds for socks or a tail tip.
- Embroider small stripes after assembly.
- Add a white chest patch with surface embroidery.
- Adjust the mouth curves to make a sleepy, curious, or cheerful expression.
- Crochet the two eyes in different embroidery colors for a fantasy cat.
Safety and care
Use embroidery instead of plastic features for a toy intended for a child under three. Skip bells, beads, buttons, wire, and removable collars for young children. Inspect the stitching regularly and use care instructions appropriate to the yarn and filling selected for the tested sample.
Keep making
Suggested internal links to add when available:
- How to Stuff Amigurumi Smoothly
- Safety Eyes and Lower-Risk Alternatives
- Easy-to-Follow Handmade Crochet Platypus Amigurumi
- Beginner Moonbeam Bunny Amigurumi Pattern
This is an original Amigurumi Magic pattern for personal use. Copyright covers this original wording, photography, illustrations, and the specific arrangement of the design, not standard crochet methods. Do not copy, sell, translate, or republish the pattern itself without written permission. Terms for limited sales of handmade finished cats will be established before the pattern is published.
Report a suspected error through the Contact page so the correction date can be recorded.