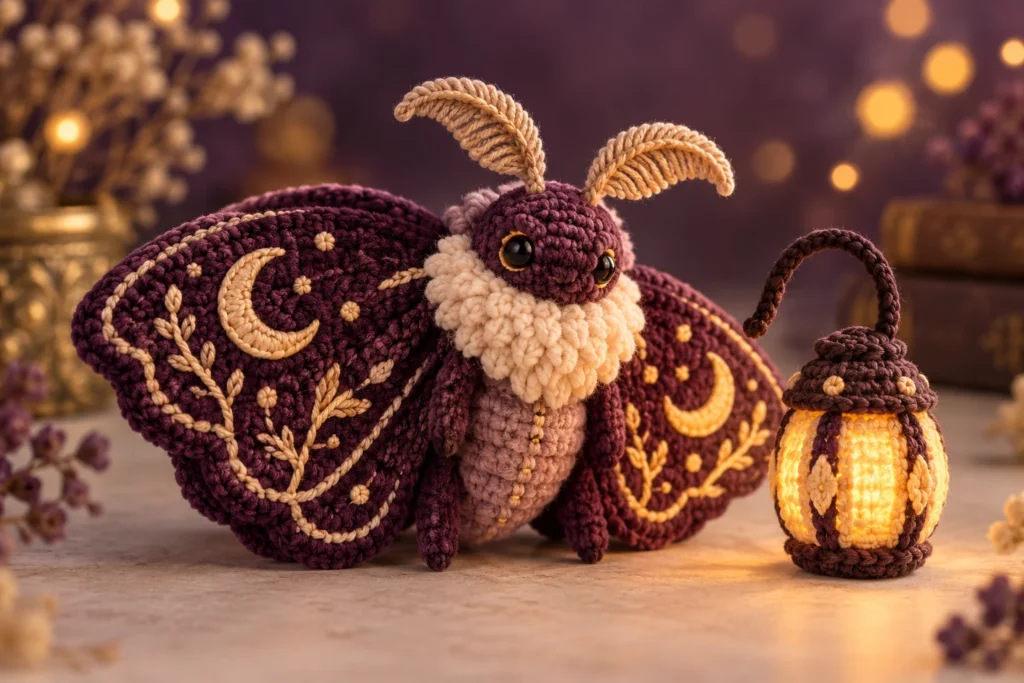
This original Lantern Moth is a gentle night-garden character with a charcoal body, four plum-colored wings, embroidered moon marks, and a separate stuffed lantern. The lantern is crocheted from yarn only; it contains no light, battery, wire, bead, or rigid insert. The pattern combines spiral rounds, flat oval wings, surface embroidery, and sewn construction for intermediate crocheters.
Pattern note: This is an original Amigurumi Magic design. Read every section before starting, keep notes about any yarn or tension adjustments, and use the Contact page to report a suspected instruction error. Nina Lojank is the site’s disclosed fictional pen-name persona.
Commercial disclosure: This article contains no affiliate links or sponsored recommendations.
In this pattern
- Project snapshot
- Materials, abbreviations, and special techniques
- Head, body, limbs, antennae, wings, and lantern
- Assembly and finishing
- Troubleshooting, customization, safety, and usage terms
Project snapshot
- Terminology: US crochet terms
- Planned yarn: DK / weight 3 cotton or cotton-acrylic yarn
- Planned hook: 3.25 mm (D-3), adjusted to create a dense fabric
- Construction: Separate stuffed and flat pieces joined by sewing
- Sewing level: Moderate
- Finished size: Varies by yarn, hook, stuffing, and personal tension
- Yardage and completion time: Vary with yarn choice and crocheting pace
- Pattern status: Original Amigurumi Magic pattern
The planned palette uses charcoal for the moth, deep plum for the wings, dusty rose and pale gold for embroidery, and warm yellow with gold trim for the lantern. A high-contrast palette will make the wing markings and lantern readable in photographs.
Before you begin
Work the head, body, limbs, antennae, and lantern in continuous spiral rounds unless instructed otherwise. Mark the first stitch and count after every round. The upper and lower wings are flat ovals worked around both sides of a foundation chain.
The moth and lantern are separate objects. The arms may be posed around the lantern for photography, but the lantern should not be permanently tied to the moth until the physical test confirms that the combined seam is durable and the character remains balanced.
Abbreviations
- BLO: back loop only
- ch: chain
- dec: invisible single crochet decrease
- inc: work 2 single crochet stitches in the same stitch
- MR: magic ring
- rnd(s): round(s)
- sc: single crochet
- sl st: slip stitch
- st(s): stitch(es)
Special stitches and techniques
Invisible decrease (dec): Insert the hook through the front loop of each of the next two stitches. Yarn over and pull through both front loops, then yarn over and pull through the two loops on the hook.
Crocheting around a foundation chain: Work across the top loops of the chain, place the indicated stitches in the last chain, rotate the work, and crochet into the unused loops along the opposite side. Do not turn between oval rounds.
Surface embroidery: Bring the yarn needle up through the fabric, lay a short stitch across the surface, and take the needle down close to the starting point. Keep the thread relaxed so the wing remains flat. Knot and bury all tails on the wrong side.
Materials and tools
- DK / weight 3 yarn in charcoal for the head, body, arms, legs, and antennae
- DK / weight 3 yarn in deep plum for four wings
- Small amounts of dusty rose and pale gold yarn for wing embroidery
- DK / weight 3 yarn in warm yellow for the lantern body
- DK / weight 3 yarn in muted gold for the lantern base, cap, bars, and handle
- 3.25 mm (D-3) crochet hook
- Polyester fiberfill
- Locking stitch marker
- Yarn needle
- Scissors
- Straight pins or removable markers for assembly
- Optional safety eyes for a display piece only, with size to be selected after sample review; embroidered eyes reduce detachable parts
Do not add a real lamp, LED, battery, wire, wooden ring, glass, bell, or weighted pellets. Do not publish yarn quantities until a physical sample has been weighed.
Crochet instructions
Head in charcoal
- Rnd 1: Work 6 sc in a MR. (6)
- Rnd 2: Inc in each st around. (12)
- Rnd 3: [Sc in next st, inc in next st] 6 times. (18)
- Rnd 4: [Sc in next 2 sts, inc in next st] 6 times. (24)
- Rnds 5-8: Sc in each st around. (24 for 4 rnds)
- If using safety eyes on a display piece, place them between Rnds 6 and 7 with 7 stitches between the visible stems. For a young child’s toy, embroider the eyes after the head is closed.
- Rnd 9: [Sc in next 2 sts, dec] 6 times. (18)
- Begin stuffing evenly.
- Rnd 10: [Sc in next st, dec] 6 times. (12)
- Rnd 11: Dec 6 times. (6)
- Fasten off and close through the front loops.
Body in charcoal
- Rnd 1: Work 6 sc in a MR. (6)
- Rnd 2: Inc in each st around. (12)
- Rnd 3: [Sc in next st, inc in next st] 6 times. (18)
- Rnds 4-6: Sc in each st around. (18 for 3 rnds)
- Rnd 7: [Sc in next 4 sts, dec] 3 times. (15)
- Rnds 8-10: Sc in each st around. (15 for 3 rnds)
- Rnd 11: [Sc in next 3 sts, dec] 3 times. (12)
- Rnds 12-14: Sc in each st around. (12 for 3 rnds)
- Stuff the lower body firmly and the top lightly.
- Rnd 15: [Sc in next st, dec] 4 times. (8)
- Rnd 16: Sc in each st around. (8)
- Fasten off with a long sewing tail. Leave the opening unclosed for attachment to the head.
Arms, make 2 in charcoal
- Rnd 1: Work 6 sc in a MR. (6)
- Rnds 2-7: Sc in each st around. (6 for 6 rnds)
- Do not stuff. Flatten the opening and sc through both layers 3 times. (3)
- Fasten off with a long sewing tail.
Legs, make 2 in charcoal
- Rnd 1: Work 6 sc in a MR. (6)
- Rnd 2: [Sc in next st, inc in next st] 3 times. (9)
- Rnds 3-5: Sc in each st around. (9 for 3 rnds)
- Add a very small pinch of stuffing to the lower half. Flatten the opening and sc through both layers 4 times, leaving one stitch tucked inside the fold. (4)
- Fasten off with a long sewing tail.
Antennae, make 2 in charcoal
- Ch 9.
- Beginning in the second ch from the hook, sl st in each ch across. (8)
- Fasten off, leaving a long tail at the base. Weave the short starting tail down through the slip stitches and trim only after it is secure.
The finished antennae must remain soft. Do not insert wire, fishing line, pipe cleaners, or glue.
Upper wings, make 2 in deep plum
- Ch 10.
- Rnd 1: Beginning in the second ch from the hook, sc in the next 8 chs, work 3 sc in the final ch, rotate to work along the opposite side of the foundation chain, sc in the next 7 unused loops, then inc in the final unused loop. (20)
- Rnd 2: Inc in the first st, sc in the next 7 sts, inc in each of the next 3 sts, sc in the next 7 sts, inc in each of the final 2 sts. (26)
- Rnd 3: [Sc in next st, inc in next st], sc in the next 7 sts, [sc in next st, inc in next st] 3 times, sc in the next 7 sts, [sc in next st, inc in next st] 2 times. (32)
- Sl st in the next st. Fasten off with a long sewing tail.
- With pale gold, embroider a small crescent near the broad end. With dusty rose, embroider three short radiating lines below the crescent. Bury all tails on the wrong side.
Lower wings, make 2 in deep plum
- Ch 7.
- Rnd 1: Beginning in the second ch from the hook, sc in the next 5 chs, work 3 sc in the final ch, rotate to work along the opposite side of the foundation chain, sc in the next 4 unused loops, then inc in the final unused loop. (14)
- Rnd 2: Inc in the first st, sc in the next 4 sts, inc in each of the next 3 sts, sc in the next 4 sts, inc in each of the final 2 sts. (20)
- Sl st in the next st. Fasten off with a long sewing tail.
- With dusty rose, embroider one small circle or a cluster of three short stitches near the broad end. Bury all tails on the wrong side.
Soft lantern
Begin at the base with muted gold.
- Rnd 1: Work 6 sc in a MR. (6)
- Rnd 2: Inc in each st around. (12)
- Rnd 3: BLO sc in each st around. (12)
- Change to warm yellow while completing the final sc of Rnd 3.
- Rnds 4-8: Sc in each st around. (12 for 5 rnds)
- Change to muted gold while completing the final sc of Rnd 8.
- Rnd 9: BLO sc in each st around. (12)
- Rnd 10: [Sc in next st, dec] 4 times. (8)
- Before stuffing, work the four lantern surface bars described below so their knots can remain inside. Then stuff the lantern lightly so it remains cylindrical.
- Rnd 11: Dec 4 times. (4)
- Fasten off and close through the front loops.
Lantern handle in muted gold
- Ch 19.
- Beginning in the second ch from the hook, sl st in each ch across. (18)
- Fasten off with two long tails, one at each end.
Sew one end of the handle to each side of the lantern cap at Rnd 9. Sew through each end at least three times, then knot and bury the tails inside the lantern. The handle is decorative and must never be used to suspend weight.
Lantern surface bars in muted gold
Cut four yarn lengths long enough to cross the yellow section with tails for securing. With the yarn needle, make four evenly spaced vertical straight stitches from the lower edge of Rnd 9 to the upper edge of Rnd 3. Keep each stitch resting on the surface rather than pulling the lantern inward. Knot matching tails inside the lantern before the final opening is closed.
Assembly and finishing
- Join the head and body. Center the body’s 8-stitch opening against the bottom of the head. Sew around twice, adding a pinch of filling before the final stitches if the neck bends.
- Arrange the wings. On the back, pin the two upper wings with their narrow ends near the center line and broad ends angled upward. Pin the lower wings beneath them, angled down and outward. Keep the embroidered right side facing away from the body.
- Sew the wings. Sew only the narrow inner section of each wing to the body so the outer oval remains visible. Stitch each join twice. Do not sew through the embroidered crescent or dot motifs.
- Attach the legs. Pin the flattened edges on the lower sides of the body across approximately Rnds 4-6. Check that the character rests evenly, then sew each 4-stitch edge twice.
- Attach the arms. Pin one flattened arm edge on each side of the upper body across approximately Rnds 11-13. Angle both arms toward the front so they can rest beside the lantern. Sew each 3-stitch edge twice.
- Attach the antennae. Pin the base of each antenna between approximately Rnds 2 and 4 of the head. Angle them slightly outward and sew through the base several times. Do not stiffen them.
- Finish the face. For the embroidered version, stitch two closed curved eyes across Rnds 6-7 and a tiny V-shaped mouth on Rnd 8. Add one pale-gold highlight stitch to each eye if desired. Bury all yarn tails securely.
- Check the lantern. Confirm that the handle and four surface bars are secure and that no stuffing shows through the stitches. The lantern may be placed between the arms for display. Do not claim that the moth holds it securely until the physical sample is tested.
- Final inspection. Pull gently on each limb, wing, antenna, and lantern component. Check every surface for exposed tails, loops, holes, or loose embroidery. Record any corrections in the master pattern.
Troubleshooting
One wing is larger than its partner
Confirm that both pieces use the same foundation-chain length and that all increases were worked into the curved ends. Steam or wet blocking will not correct a missing stitch. Rework the inaccurate wing before assembly.
The embroidered wing marks pucker
The surface stitches are too tight. Remove them and embroider again with enough slack for the wing to lie flat. Anchor each motif with small, separate stitches rather than one long strand pulled across the back.
The head bends at the neck
Add a small amount of stuffing through an opened section of the neck seam, then resew twice. Avoid inserting a support rod or wire. During testing, record how much neck filling creates stability without distortion.
The lantern loses its cylindrical shape
Use small pinches of stuffing and keep the center slightly softer than the top and bottom edges. If the stitches stretch, try a smaller hook on the test sample and update the final material recommendation.
The lantern bars pull inward
The vertical surface stitches are too tight. Rework them so they rest lightly on the yellow fabric. All four bars should have equal tension.
Customization ideas
- Swap deep plum for rust, sage, or smoky blue while keeping high contrast with the embroidered motifs.
- Use simple dots, tiny stars, or short lines on the wings, but avoid beads and glued embellishments.
- Make the lantern in cool moonlight colors or warm candlelight colors without changing its construction.
- Omit the lantern and angle the arms outward for a simpler display character.
Physical-test any revised wing size, handle length, or attachment method before publishing it as an approved variation.
Safety and care
The antennae, limbs, wings, lantern handle, lantern bars, and optional safety eyes can become hazards if they detach. For a toy intended for a child under three, use embroidered facial features, reinforce every seam, omit the separate lantern, and supervise play. Never place a real light, electronic component, battery, wire, glass, bead, or hot object inside the crocheted lantern. Treat the finished piece as a handmade decorative item, not a safety-certified toy; use embroidered features for young children and supervise play.
Publish care directions only after a completed sample has been washed according to the chosen yarn label and checked for color transfer, shrinkage, embroidery movement, and seam strength.
Keep making
Original-use note
This Lantern Moth and its soft lantern are original AmigurumiMagic.com designs. They are not copied from, affiliated with, or presented as another designer’s pattern or any film, animation, game, or book character. Do not republish, translate, sell, or redistribute the written instructions or photographs without written permission. A finished-item sales policy will be added only after the pattern has been physically tested and approved. Report a suspected error through the Contact page so the correction date can be recorded.