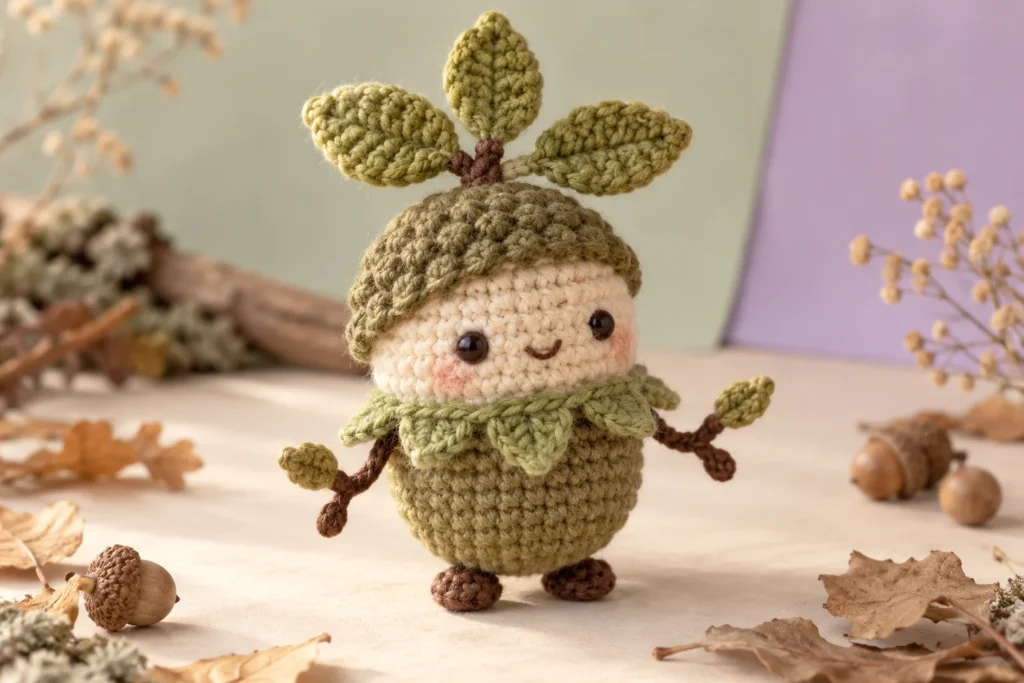
This original Two-Color Forest Spirit is shaped like a small woodland seed rather than an animal. Its rounded cream base changes to green at the waist, then narrows into a pointed crown. A scalloped moss collar and three soft leaves give it a distinct botanical silhouette, while embroidered eyes keep the face simple. This pattern is intended for advanced beginners who are comfortable with basic color changes and sewn assembly.
Pattern note: This is an original Amigurumi Magic design. Read every section before starting, keep notes about any yarn or tension adjustments, and use the Contact page to report a suspected instruction error. Nina Lojank is the site’s disclosed fictional pen-name persona.
Commercial disclosure: This article contains no affiliate links or sponsored recommendations.
In this pattern
- Project snapshot
- Materials, abbreviations, and special stitches
- Two-color body, feet, arms, collar, and leaves
- Assembly and finishing
- Troubleshooting, customization, safety, and usage terms
Project snapshot
- Terminology: US crochet terms
- Planned yarn: DK / weight 3 cotton or cotton-acrylic yarn
- Planned hook: 3.25 mm (D-3), adjusted if needed to make a dense fabric
- Construction: Body worked in one continuous piece; smaller pieces sewn on
- Sewing level: Light to moderate
- Finished size: Varies by yarn, hook, stuffing, and personal tension
- Yardage and completion time: Vary with yarn choice and crocheting pace
- Pattern status: Original Amigurumi Magic pattern
The planned palette uses warm cream for the seed-shaped lower body and muted moss green for the upper body, collar, and leaf crown. The face is embroidered in dark brown. Choosing two colors with clear value contrast helps the waist color change remain visible.
Before you begin
All body and limb pieces are worked in continuous spiral rounds unless stated otherwise. Mark the first stitch of each round. The moss collar and leaves are worked in rows. Count at the end of every round, especially immediately before and after the color change.
The color change is placed at the beginning of Rnd 11. For a cleaner transition, complete the final yarn-over of the last stitch of Rnd 10 with moss green. Keep both yarn tails inside the body and knot them securely before stuffing.
Abbreviations
- BLO: back loop only
- ch: chain
- dc: double crochet
- dec: invisible single crochet decrease
- hdc: half double crochet
- inc: work 2 single crochet stitches in the same stitch
- MR: magic ring
- rnd(s): round(s)
- sc: single crochet
- sl st: slip stitch
- st(s): stitch(es)
Special stitches
Invisible decrease (dec): Insert the hook under the front loop of each of the next two stitches. Yarn over and pull through both front loops. Yarn over and pull through the remaining two loops.
Three-stitch shell: Work 3 dc into the indicated stitch. In the moss collar, each shell sits between slip stitches to form a rounded tuft.
Clean color change: Begin the final sc in the old color, stopping with two loops on the hook. Draw the new color through those two loops to complete the stitch, then continue in the new color.
Materials and tools
- DK / weight 3 yarn in warm cream for the lower body and feet
- DK / weight 3 yarn in muted moss green for the upper body, arms, collar, and leaf crown
- Small amount of dark brown yarn for the embroidered face
- Optional small amount of muted gold yarn for embroidered freckles
- 3.25 mm (D-3) crochet hook
- Polyester fiberfill
- Locking stitch marker
- Yarn needle
- Scissors
- Straight pins or removable markers for assembly
This design intentionally avoids plastic eyes, wire, beads, bells, and pellets. Do not publish yarn quantities until they have been measured from a physical sample.
Crochet instructions
Two-color body
Begin with warm cream.
- Rnd 1: Work 6 sc in a MR. (6)
- Rnd 2: Inc in each st around. (12)
- Rnd 3: [Sc in next st, inc in next st] 6 times. (18)
- Rnd 4: [Sc in next 2 sts, inc in next st] 6 times. (24)
- Rnd 5: [Sc in next 3 sts, inc in next st] 6 times. (30)
- Rnd 6: [Sc in next 4 sts, inc in next st] 6 times. (36)
- Rnds 7-10: Sc in each st around. (36 for 4 rnds)
- Change to moss green while completing the final sc of Rnd 10.
- Rnd 11: Sc in each st around. (36)
- Rnd 12: [Sc in next 4 sts, dec] 6 times. (30)
- Rnds 13-14: Sc in each st around. (30 for 2 rnds)
- Rnd 15: [Sc in next 3 sts, dec] 6 times. (24)
- Rnds 16-18: Sc in each st around. (24 for 3 rnds)
- Rnd 19: [Sc in next 2 sts, dec] 6 times. (18)
- Rnds 20-21: Sc in each st around. (18 for 2 rnds)
- Embroider the face before the opening gets smaller. Center two closed curved eyes across Rnds 15-16, leaving 7 stitches between their inner ends. Add a short curved mouth on Rnd 17 and optional gold freckles beside it. Knot and bury all ends inside.
- Stuff the lower body firmly, then add smaller pinches toward the upper body. Keep the top rounded rather than pointed.
- Rnd 22: [Sc in next st, dec] 6 times. (12)
- Rnd 23: Dec 6 times. (6)
- Fasten off and close through the front loops. Bury the tail securely.
Feet, make 2 in warm cream
- Rnd 1: Work 6 sc in a MR. (6)
- Rnd 2: Inc in each st around. (12)
- Rnd 3: BLO sc in each st around. (12)
- Rnd 4: Sc in each st around. (12)
- Rnd 5: [Sc in next 2 sts, dec] 3 times. (9)
- Rnd 6: Sc in each st around. (9)
- Add a small pinch of stuffing. Flatten the opening and sc through both layers 4 times, leaving one stitch tucked inside the fold. (4)
- Fasten off with a long sewing tail.
Twig arms, make 2 in moss green
- Rnd 1: Work 6 sc in a MR. (6)
- Rnds 2-8: Sc in each st around. (6 for 7 rnds)
- Do not stuff. Flatten the opening and sc through both layers 3 times. (3)
- Fasten off with a long sewing tail.
Moss collar in moss green
The collar is a flat strip that is wrapped around the color-change line after the body is stuffed.
- Row 1: Ch 31. Beginning in the second ch from the hook, sc in each ch across. Turn. (30)
- Row 2: Ch 1, [sl st in next st, 3 dc in next st, sl st in next st] 10 times. (10 shells)
- Fasten off with a long sewing tail.
Before attaching, wrap Row 1 around the body at Rnd 11. If the physical test shows the strip is too long or short for the selected yarn tension, revise the foundation chain and repeat count before this pattern is promoted as tested rather than stretching the piece.
Crown leaves, make 3 in moss green
Each leaf is worked on both sides of a foundation chain.
- Ch 8.
- Beginning in the second ch from the hook, sl st in the next ch, sc in the next ch, hdc in the next ch, dc in the next 2 chs, hdc in the next ch, and work 3 sc in the final ch.
- Rotate to work along the unused loops on the opposite side of the foundation chain. Hdc in the next ch, dc in the next 2 chs, hdc in the next ch, sc in the next ch, and sl st in the final ch.
- Sl st to the first sl st. Fasten off with a long sewing tail. (15 sts around the leaf, excluding the join)
Fold each leaf gently along its foundation chain to create a center vein. Do not add wire.
Assembly and finishing
- Pin all pieces first. Set the stuffed body upright and use removable markers to establish the center front. Check the face and color change from several angles.
- Attach the feet. Pin the flattened 4-stitch edge of each foot across approximately Rnds 4-6 of the body. Leave a small gap between the inner edges. Sew each foot twice through the flattened edge and body fabric. Confirm that the body rests steadily before knotting the tails.
- Attach the arms. Pin one arm on each side of the green upper body, with the top edge near Rnd 15. Angle one arm slightly upward and the other slightly downward for an asymmetrical twig-like pose. Sew through each 3-stitch flattened edge twice.
- Attach the collar. Wrap the 30-stitch foundation edge around Rnd 11 with the shells pointing upward over the green body. Butt the short ends together at the center back. Sew Row 1 to the body, then join the two short ends invisibly.
- Attach the leaf crown. Arrange the three leaves around the closed top of the body. Point the center leaf upward and angle the side leaves outward. Sew the narrow base of each leaf through several body stitches. Take a second seam pass and bury all tails.
- Shape and inspect. Smooth the stuffing, gently curve the leaves, and make sure no yarn ends or stuffing fibers are exposed. Tug each attached piece separately to test the seams.
Troubleshooting
The color-change line forms a step
A slight jog is normal in continuous rounds. Place the collar over the transition so the join becomes part of the design. Do not cut or alter completed body stitches to force a perfectly level line.
The body leans
Uneven stuffing or mismatched foot placement is the most likely cause. Roll the body between your palms to redistribute filling, then re-pin the feet at equal distances from the center front.
The top looks pointed
Too much filling near Rnd 23 can create a point. Remove a small amount of stuffing before closing, then massage the remaining filling away from the final six stitches. The leaf crown should provide the vertical shape.
The collar ripples too much
The foundation strip may have been stretched while sewing. Remove the collar and pin it at four evenly spaced points before stitching between those anchors. Confirm the fit on the physical test sample and revise the chain count if necessary.
Customization ideas
- Reverse the two main colors to make a pale-capped spirit with a green seed base.
- Embroider three small gold freckles on each cheek or leave the face completely minimal.
- Angle the three crown leaves differently to create distinct personalities without changing the construction.
- Add surface-embroidered vein stitches to the crown leaves using the cream body color.
Treat each structural variation as unverified until it has been crocheted and checked on a sample.
Safety and care
Although the face is embroidered and the design uses no internal wire, the feet, arms, collar, and leaves are sewn-on parts that may detach. Reinforce every seam, bury yarn tails in several directions, and supervise play by young children. Treat the finished piece as a handmade decorative item, not a safety-certified toy; use embroidered features for young children and supervise play.
Do not publish washing instructions until the selected yarn and a completed sample have been washed according to the yarn label and checked for color transfer, distortion, and seam movement.
Keep making
Original-use note
This Two-Color Forest Spirit is an original AmigurumiMagic.com design with a botanical, seed-shaped silhouette. It is not based on, affiliated with, or presented as any film, animation, game, or book character. Do not republish, translate, sell, or redistribute the written instructions or photographs without written permission. A finished-item sales policy will be added only after the pattern has been physically tested and approved. Report a suspected error through the Contact page so the correction date can be recorded.