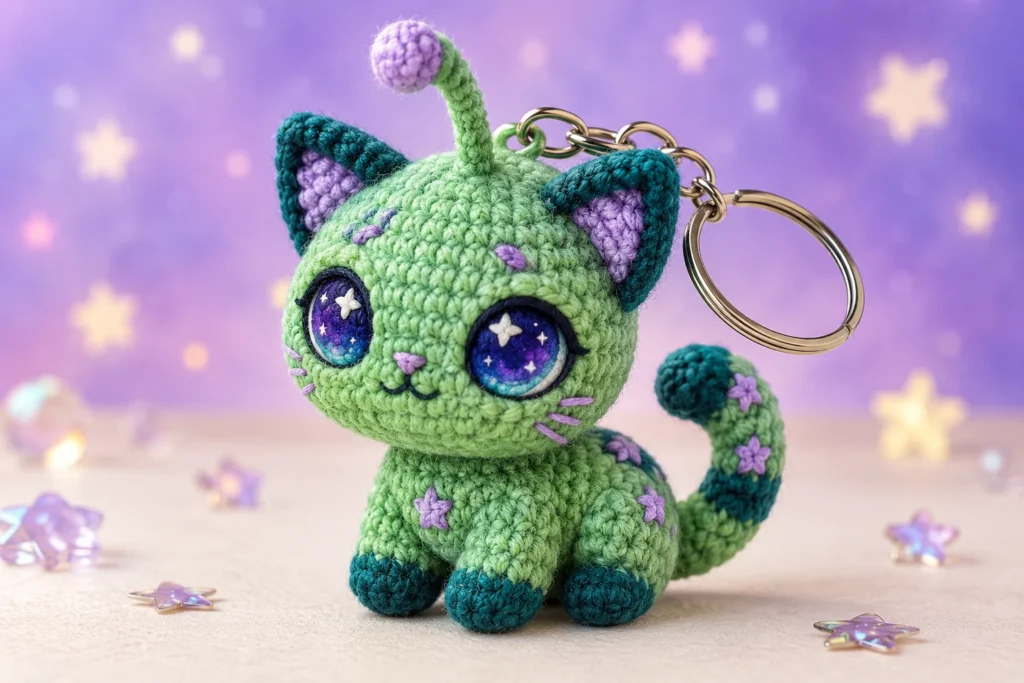
This tiny green traveler combines a cat’s pointed ears and curling tail with oversized embroidered eyes and a soft yarn antenna. Add keychain hardware for an accessory, or omit it to keep the character entirely textile. This pattern is written for beginners who are comfortable working small pieces in continuous rounds.
Commercial disclosure: This article contains no affiliate links or sponsored recommendations.
In this pattern
- Project snapshot
- Materials, abbreviations, and safety
- One-piece head and body
- Ears, arms, feet, tail, and antenna
- Keychain loop and assembly
- Troubleshooting and customization
Project snapshot
| Detail | Pattern overview |
|---|---|
| Skill level | Beginner |
| Crochet terms | US |
| Construction | One-piece head/body with small sewn parts |
| Sewing | Moderate and small-scale |
| Yarn | Light-weight yarn in green plus small accent amounts |
| Finished size | Varies by yarn, hook, stuffing, and personal tension |
| Hardware | Optional split ring or lobster clasp; final attachment method requires testing |
| Time and yardage | Vary with yarn choice and crocheting pace |
Before you begin
Work spiral rounds and mark the first stitch. Because the piece is small, embroidered features are preferred to plastic eyes. The hardware is optional and must never be treated as part of a baby toy.
The antenna is a short crocheted cord without wire. Keep it soft and sew its base through several body stitches.
Abbreviations
- ch: chain
- sc: single crochet
- inc: 2 sc in the same stitch
- dec: invisible single crochet decrease over the next 2 stitches
- sl st: slip stitch
- st(s): stitch(es)
- Rnd: round
- Row: row
- FO: fasten off
- MR: magic ring
Special stitches
Invisible decrease: Insert the hook under the front loop of each of the next 2 stitches. Yarn over and draw through both front loops, then yarn over and draw through the 2 loops on the hook.
Chain cord: Make the stated number of chains, then sl st in the back bump of each chain while returning toward the beginning. This makes a compact, flat cord.
Materials and tools
- Light (3) yarn in bright or muted green
- Small amounts of a darker green and an eye color such as black, navy, or deep purple
- Small amount of white embroidery yarn for eye highlights
- 2.75 mm (C-2) crochet hook; final hook choice pending sample testing
- Polyester fiberfill
- Locking stitch marker
- Yarn needle and small scissors
- Optional metal split ring, lobster clasp, or keychain fitting
- Optional pliers suitable for the selected hardware
Actual yarn usage, hardware dimensions, and attachment strength must be recorded during physical testing.
Instructions
Head and body
With green yarn:
- Rnd 1: Work 6 sc in an MR. (6)
- Rnd 2: Inc in each st around. (12)
- Rnd 3:
(sc, inc)x 6. (18) - Rnd 4:
(2 sc, inc)x 6. (24) - Rnds 5–9: Sc in each st around. (24 each round)
- Rnd 10:
(2 sc, dec)x 6. (18) - Rnd 11:
(sc, dec)x 6. (12) - Stuff the head firmly but do not stretch the stitches.
- Rnd 12:
(sc, inc)x 6. (18) - Rnds 13–17: Sc in each st around. (18 each round)
- Rnd 18:
(sc, dec)x 6. (12) - Stuff the body and shape a gentle waist between Rnds 11 and 12.
- Rnd 19: Dec x 6. (6)
FO, close the remaining hole through the front loops, and secure.
Ears (make 2)
Worked in turned rows with green yarn. Ch 2.
- Row 1: Work 2 sc in the second ch from the hook. Ch 1, turn. (2)
- Row 2: Inc in each st. Ch 1, turn. (4)
- Row 3: Inc, sc in the next 2 sts, inc. (6)
FO with a long sewing tail. The first row is the tip and the final row is the base.
Arms (make 2)
With green yarn:
- Rnd 1: Work 6 sc in an MR. (6)
- Rnds 2–5: Sc in each st around. (6 each round)
Do not stuff. Flatten and work 3 sc through both layers. FO with a long sewing tail.
Feet (make 2)
With green yarn:
- Rnd 1: Work 6 sc in an MR. (6)
- Rnd 2: Inc in each st around. (12)
- Rnd 3: Sc in each st around. (12)
- Rnd 4:
(sc, dec)x 4. (8)
Add a pinch of stuffing. Flatten and work 4 sc through both layers. FO with a long sewing tail.
Tail
With green or darker green yarn:
- Rnd 1: Work 5 sc in an MR. (5)
- Rnds 2–12: Sc in each st around. (5 each round)
Do not stuff and do not insert wire. FO with a long sewing tail.
Antenna
With darker green yarn, ch 7. Starting in the second ch from the hook, sl st in the back bump of each ch. (6 sl sts)
FO with a long tail at each end. Tie one end into a compact overhand knot to suggest the antenna tip, then use the other tail for sewing. The knot size and security must be evaluated on the physical sample; omit the antenna if it can pull loose.
Optional textile hanging loop
With green yarn, ch 10. Starting in the second ch from the hook, sl st in each ch. (9 sl sts)
FO, leaving both yarn tails long. This loop is an attachment point for display; its load strength has not been tested.
Face and assembly
All positions below are provisional until the sample is reviewed.
- Sew the ear bases to opposite sides of the crown near Rnds 2–4.
- Embroider two large vertical oval eyes across Rnds 6–8, leaving approximately 3 stitches between them. Add one small white highlight to each eye.
- Embroider a tiny inverted triangle nose between the eyes and one short mouth line below it.
- Sew the arms to the sides of the body near Rnds 12–14.
- Attach the feet at the base near Rnds 16–18, pointing them slightly forward.
- Sew the tail to the back near Rnds 15–18 and curve it around one side. Add one discreet anchoring stitch near the tail tip if desired.
- Sew the antenna at the top center through several stitches. Tug gently to check the seam; final durability requires formal sample testing.
Adding optional keychain hardware
Fold the textile hanging loop in half. Pass both ends through separate stitches at the top of the head, avoiding the magic-ring center, and knot them securely inside or sew each end repeatedly through the fabric. Attach the selected metal ring only after the loop is secured.
This attachment method remains provisional. Before commercial use, load-test the loop and inspect how the yarn wears against the metal. The keychain should be treated as an accessory with small parts, not as a toy.
Troubleshooting and finishing
If stuffing shows through
Use a smaller hook or a denser yarn before reducing the stuffing. A keychain receives friction in use, so the fabric must be especially firm.
If the character hangs sideways
Move the loop closer to the true top center. Check that the tail and feet are not weighted unevenly before resewing the loop.
If the embroidered eyes pucker
Loosen the embroidery and build the oval with several relaxed vertical stitches. Avoid pulling long stitches tightly across the stuffing.
Customization ideas
- Use lilac, blue, or speckled yarn for a different planet palette.
- Embroider a tiny star on the belly.
- Make three short antenna cords for a crown-like silhouette.
- Add stripes to the tail with surface slip stitches.
- Omit all hardware and turn the character into a desk companion.
Safety and care
Metal keychain hardware, clips, plastic eyes, and loose decorations are choking hazards. This accessory is not for babies or children under three. Do not hang it where it could entangle a child or pet. Inspect the yarn loop and metal fitting regularly and stop using the accessory if either begins to fray, open, or loosen.
Keep making
Suggested internal links to add when ready:
- How to Crochet a Magic Ring
- Safety Eyes and Lower-Risk Alternatives
- From Yarn to Meow: Crocheting Your Own Cute Cat
- Beginner Moonbeam Bunny Amigurumi Pattern
This original Amigurumi Magic pattern is for personal use. Copyright applies to this wording, original illustrations and photographs, and the specific arrangement of this character design; ordinary crochet stitches and techniques remain free for everyone to use. Do not reproduce, translate, sell, or distribute this pattern without written permission. Rules for selling handmade finished keychains will be finalized before this pattern is promoted as tested.
Report a suspected error through the Contact page so the correction date can be recorded.