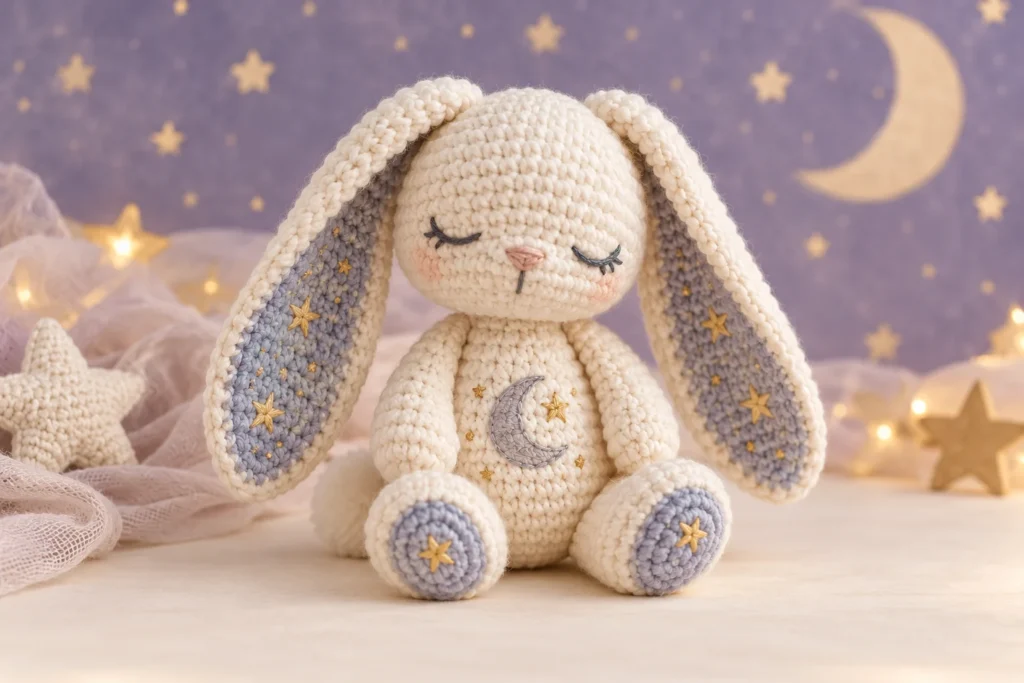
Moonbeam Bunny is an original long-eared rabbit concept with a quiet nighttime palette and a small crescent embroidered on its belly. The head and body flow together in one piece, while the soft ears and simple limbs are sewn on afterward. This pattern is intended for beginners who can work basic amigurumi rounds and sew on simple pieces.
Commercial disclosure: This article contains no affiliate links or sponsored recommendations.
In this pattern
- Project snapshot
- Materials and crochet vocabulary
- Head and body
- Ears, arms, legs, and tail
- Face and crescent embroidery
- Assembly, troubleshooting, and variations
Project snapshot
| Detail | Pattern overview |
|---|---|
| Skill level | Beginner |
| Crochet terms | US |
| Construction | One-piece head/body with sewn appendages |
| Sewing | Moderate |
| Yarn | Medium-weight yarn in main and accent colors |
| Finished size | Varies by yarn, hook, stuffing, and personal tension |
| Time and yardage | Vary with yarn choice and crocheting pace |
Before you begin
Crochet all round pieces in continuous spirals unless instructed otherwise. Mark the first stitch and count each completed round. Stuff the head before the neck narrows too far, then add filling to the body a little at a time.
The crescent is embroidered directly onto the finished belly. It is not a separate appliqué, which keeps the motif flat and avoids an extra detachable piece.
Abbreviations
- ch: chain
- sc: single crochet
- inc: 2 sc in the same stitch
- dec: invisible single crochet decrease over the next 2 stitches
- sl st: slip stitch
- st(s): stitch(es)
- Rnd: round
- FO: fasten off
- MR: magic ring
Special stitches
Invisible decrease: Insert the hook under the front loop of each of the next 2 stitches. Yarn over and pull through both front loops, then yarn over and pull through the 2 loops on the hook.
Surface backstitch: Bring the needle up through the fabric, take it down one short stitch behind, and bring it up one stitch ahead. Repeat to form a smooth embroidered line without pulling the crochet fabric inward.
Materials and tools
- Medium (4) yarn in cream, silver, pale blue, or another main color
- Medium (4) yarn in a moonlight accent such as lavender or gold
- Small amounts of black and pink embroidery yarn
- 3.25 mm (D-3) crochet hook; confirm hook size during sample testing
- Polyester fiberfill
- Locking stitch marker
- Yarn needle and scissors
- Pins for provisional assembly
- Optional safety eyes, with size to be selected only after sample review
Exact yardage, gauge behavior, and eye size must be recorded during physical testing.
Instructions
Head and body
With the main color:
- Rnd 1: Work 6 sc in an MR. (6)
- Rnd 2: Inc in each st around. (12)
- Rnd 3:
(sc, inc)x 6. (18) - Rnd 4:
(2 sc, inc)x 6. (24) - Rnd 5:
(3 sc, inc)x 6. (30) - Rnds 6–11: Sc in each st around. (30 each round)
If using safety eyes for a display piece, provisional placement is between Rnds 8 and 9, 6 stitches apart. Confirm position and component size on the sample.
- Rnd 12:
(3 sc, dec)x 6. (24) - Rnd 13:
(2 sc, dec)x 6. (18) - Stuff the head evenly.
- Rnd 14:
(2 sc, inc)x 6. (24) - Rnd 15:
(3 sc, inc)x 6. (30) - Rnd 16:
(4 sc, inc)x 6. (36) - Rnds 17–25: Sc in each st around. (36 each round)
- Rnd 26:
(4 sc, dec)x 6. (30) - Rnd 27:
(3 sc, dec)x 6. (24) - Rnd 28:
(2 sc, dec)x 6. (18) - Stuff the body, shaping a flat seated base.
- Rnd 29:
(sc, dec)x 6. (12) - Rnd 30: Dec x 6. (6)
FO, draw the final 6 front loops closed, and secure.
Ears (make 2)
With the main color:
- Rnd 1: Work 6 sc in an MR. (6)
- Rnd 2: Inc in each st around. (12)
- Rnds 3–12: Sc in each st around. (12 each round)
- Rnd 13:
(2 sc, dec)x 3. (9) - Rnds 14–16: Sc in each st around. (9 each round)
Do not stuff. Flatten the opening and work 4 sc through both layers, leaving 1 stitch unworked if necessary to keep the fold centered. FO with a long sewing tail.
Optional inner-ear detail: With the accent color, use loose surface backstitches to make one long line down the front center of each ear.
Arms (make 2)
With the main color:
- Rnd 1: Work 6 sc in an MR. (6)
- Rnd 2: Inc in each st around. (12)
- Rnds 3–8: Sc in each st around. (12 each round)
- Rnd 9:
(sc, dec)x 4. (8) - Rnds 10–11: Sc in each st around. (8 each round)
Lightly stuff the lower half. Flatten and work 4 sc through both layers. FO with a long sewing tail.
Legs (make 2)
With the main color:
- Rnd 1: Work 6 sc in an MR. (6)
- Rnd 2: Inc in each st around. (12)
- Rnd 3:
(sc, inc)x 6. (18) - Rnds 4–6: Sc in each st around. (18 each round)
- Rnd 7:
(sc, dec)x 6. (12) - Rnds 8–10: Sc in each st around. (12 each round)
Stuff the foot firmly and the upper leg lightly. Flatten the opening and work 6 sc through both layers. FO with a long sewing tail.
Tail
With the main color:
- Rnd 1: Work 6 sc in an MR. (6)
- Rnd 2: Inc in each st around. (12)
- Rnd 3:
(sc, inc)x 6. (18) - Rnd 4: Sc in each st around. (18)
- Rnd 5:
(sc, dec)x 6. (12) - Stuff lightly.
- Rnd 6: Dec x 6. (6)
FO with a long tail. Close the final opening but retain the yarn tail for sewing.
Face, crescent, and assembly
Pin all pieces first. Round locations are provisional and must be adjusted after examining the physical sample.
- Sew the flattened ear bases across the crown near Rnds 2–5. Angle one slightly outward for a relaxed silhouette if desired.
- Embroider two eyes above Rnd 9 if safety eyes were not used. Keep them level and approximately 6 stitches apart.
- Add a small inverted triangle nose in pink. Work one short vertical line below it and two shallow mouth curves.
- Pin the legs low on the body near Rnds 23–27, pointing the feet forward. Sew around each flattened edge.
- Sew the arms to the sides near Rnds 16–19, angled gently toward the belly.
- Attach the tail to the back near Rnds 23–26. Check that it helps rather than prevents the bunny from sitting.
- With the accent yarn, embroider a shallow
Cshape on the center belly using surface backstitch. Add a second parallel curve inside the first, tapering the ends together to form a crescent. Keep every stitch relaxed so the belly stays smooth. - Weave in all ends through several stitches before trimming.
Troubleshooting and finishing
If the ears twist
Lay each flattened ear on the table before sewing and align the closing seam toward the back. Surface embroidery should be loose enough that it does not torque the ear.
If the bunny leans
Compare the leg height and tail position. Redistribute the body stuffing toward the base before removing and resewing a limb.
If the crescent looks jagged
Use shorter backstitches and trace the curve first with a removable fabric marker that is confirmed safe for the chosen yarn. Test any marker on a swatch.
Customization ideas
- Work one ear in the accent color.
- Embroider stars around the crescent using tiny crossed stitches.
- Add a contrasting tail or paw tips with surface embroidery.
- Choose sleepy curved eyes for a bedtime theme.
- Omit the moon and embroider a simple heart for a daytime variation.
Safety and care
For children under three, use embroidered eyes and avoid buttons, beads, wire, pellets, and removable accessories. Secure every seam, inspect the toy regularly, and stop use if yarn or stuffing becomes exposed. Final washing guidance must follow the labels of the yarn and filling used for the tested sample.
Keep making
Suggested internal links to add after publication:
- How to Read an Amigurumi Pattern
- How to Stuff Amigurumi Smoothly
- From Yarn to Meow: Crocheting Your Own Cute Cat
- Easy-to-Follow Handmade Crochet Platypus Amigurumi
This original Amigurumi Magic pattern is intended for personal use. Copyright protects this original wording, project imagery, illustrations, and the particular arrangement of this design, while standard crochet stitches and methods remain available to all makers. Do not reproduce, sell, translate, or redistribute the pattern itself without written permission. Any permission to sell handmade finished bunnies will be stated in the tested publication version.
Report a suspected error through the Contact page so the correction date can be recorded.