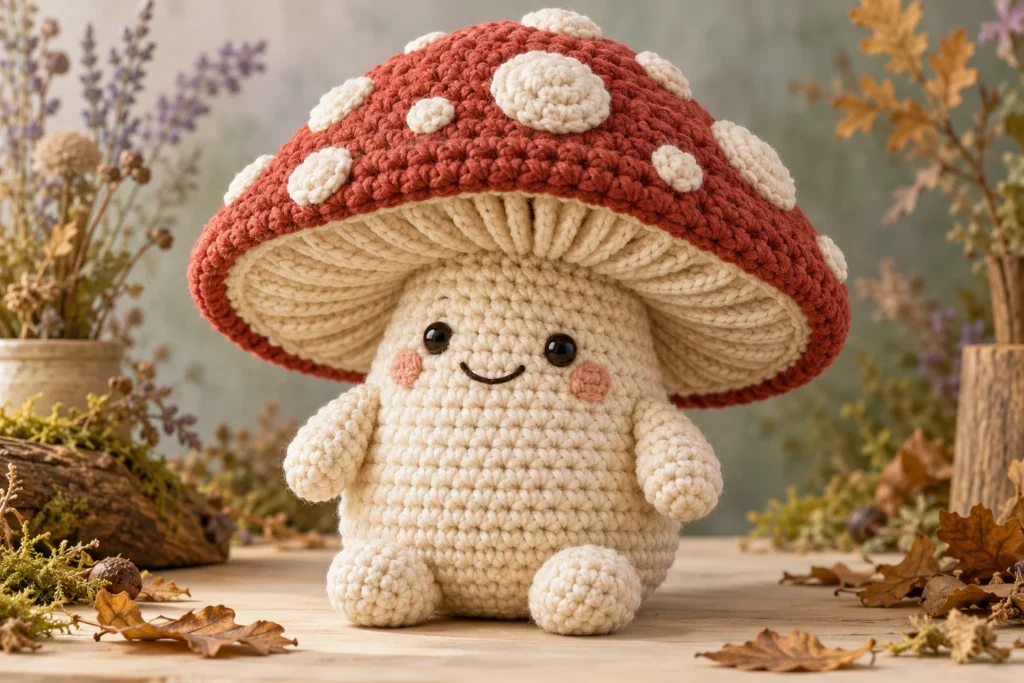
Big Mushroom Friend is an original woodland character with a rounded stalk body, a broad stuffed cap, short welcoming arms, and embroidered features. The cap uses a domed top and a flat gill panel, so it keeps a clear mushroom silhouette while providing a secure surface for attaching it to the head. This pattern is intended for intermediate crocheters who are comfortable joining large pieces and balancing stuffed shapes.
Commercial disclosure: This article contains no affiliate links or sponsored recommendations.
In this pattern
- Project snapshot
- Materials, abbreviations, and special techniques
- Stalk, head, arms, cap, gill, and spot instructions
- Full assembly guidance
- Troubleshooting, variations, care, and usage terms
Project snapshot
- Skill level: Intermediate
- Terminology: US crochet terms
- Yarn: Bulky category 5 yarn
- Hook: 5 mm (H-8), subject to gauge testing
- Construction: Bottom-up stalk and head, separate arms, and a two-layer cap
- Sewing: Arms, cap, and optional cap spots are sewn in place
- Working method: Continuous rounds except the spot finishing joins
- Estimated time: Varies by crocheting pace
- Finished size: Varies by yarn, hook, stuffing, and personal tension
- Gauge: Aim for a dense, supportive fabric that does not reveal stuffing
Materials and tools
- Bulky category 5 yarn in cream for the stalk, head, and gills
- Bulky category 5 yarn in a cap color
- Bulky category 5 yarn in a contrasting spot color
- Small amounts of black and pink yarn for embroidered features
- 5 mm (H-8) crochet hook, or the size needed for a firm fabric
- Polyester fiberfill
- Locking stitch markers
- Yarn needle suitable for bulky yarn
- Scissors
- Straight pins or removable markers for assembly
Exact yardage is omitted until a physical sample has been made and weighed. Use yarns with similar fiber content and thickness so the cap and stalk behave consistently.
Abbreviations
- BLO: back loop only
- dec: invisible single crochet decrease over the next 2 stitches
- inc: work 2 single crochet stitches in the next stitch
- MR: magic ring
- rnd: round
- sc: single crochet
- sl st: slip stitch
- st/sts: stitch/stitches
Special techniques
Invisible decrease
Insert the hook through the front loop of each of the next 2 stitches. Yarn over and pull through the first 2 loops, then yarn over and pull through both loops on the hook. One decrease consumes 2 stitches and produces 1 stitch.
Joining two cap layers
Hold the domed cap and flat gill panel with wrong sides together and their final rounds aligned. Work 1 sc through the next stitch of both layers. Each joining stitch consumes one stitch from each 48-stitch edge.
Before you begin
Use a stitch marker in the first stitch of every continuous round. Count each round before continuing. Stuff firmly enough to support the cap, but do not stretch the stitches until filling shows.
Embroider the face rather than using plastic eyes for a child-directed item. Small detachable pieces, weighted pellets, and internal wire are not appropriate for children under three. No handmade toy is indestructible; supervise play and inspect all seams regularly.
The optional spots add several sewn pieces. For a simpler version, omit them and embroider flat circles on the cap after assembly.
Instructions
Stalk body and head
With cream yarn, make an MR.
- Rnd 1: Work 6 sc in the MR. (6)
- Rnd 2: Inc in each st around. (12)
- Rnd 3: (Sc in next st, inc in next st) 6 times. (18)
- Rnd 4: (Sc in next 2 sts, inc in next st) 6 times. (24)
- Rnd 5: BLO sc in each st around. (24)
- Rnds 6-9: Sc in each st around. (24 each rnd)
- Rnd 10: (Sc in next 2 sts, dec) 6 times. (18)
- Rnds 11-13: Sc in each st around. (18 each rnd)
- Rnd 14: (Sc in next st, inc in next st) 9 times. (27)
- Rnd 15: (Sc in next 2 sts, inc in next st) 9 times. (36)
- Rnds 16-20: Sc in each st around. (36 each rnd)
- Rnd 21: (Sc in next 4 sts, dec) 6 times. (30)
- Rnd 22: (Sc in next 3 sts, dec) 6 times. (24)
- Rnd 23: (Sc in next 2 sts, dec) 6 times. (18)
Embroider the face before the opening becomes smaller. Place two closed eyes between Rnds 17 and 18, approximately 6 stitches apart. Add a short curved smile one round lower and optional pink cheek stitches. Secure all ends inside.
Begin stuffing at the base. Keep the bottom flat, the narrow stalk even, and the head smoothly rounded.
- Rnd 24: (Sc in next st, dec) 6 times. (12)
- Rnd 25: Dec 6 times. (6)
Finish stuffing. Fasten off, thread the tail through the front loops of the remaining 6 stitches, pull closed, and secure.
Arms, make 2
With cream yarn, make an MR.
- Rnd 1: Work 6 sc in the MR. (6)
- Rnds 2-5: Sc in each st around. (6 each rnd)
Do not stuff, or add only a wisp of filling near the hand. Flatten the final round and work 1 sc through both layers in each of the next 3 paired stitches. (3 joining sc)
Fasten off, leaving a tail for attachment.
Cap dome
With the cap color, make an MR.
- Rnd 1: Work 6 sc in the MR. (6)
- Rnd 2: Inc in each st around. (12)
- Rnd 3: (Sc in next st, inc in next st) 6 times. (18)
- Rnd 4: (Sc in next 2 sts, inc in next st) 6 times. (24)
- Rnd 5: (Sc in next 3 sts, inc in next st) 6 times. (30)
- Rnd 6: (Sc in next 4 sts, inc in next st) 6 times. (36)
- Rnd 7: (Sc in next 5 sts, inc in next st) 6 times. (42)
- Rnd 8: (Sc in next 6 sts, inc in next st) 6 times. (48)
- Rnds 9-11: Sc in each st around. (48 each rnd)
Fasten off and weave in the end.
Flat gill panel
With cream yarn, make an MR.
- Rnd 1: Work 6 sc in the MR. (6)
- Rnd 2: Inc in each st around. (12)
- Rnd 3: (Sc in next st, inc in next st) 6 times. (18)
- Rnd 4: (Sc in next 2 sts, inc in next st) 6 times. (24)
- Rnd 5: (Sc in next 3 sts, inc in next st) 6 times. (30)
- Rnd 6: (Sc in next 4 sts, inc in next st) 6 times. (36)
- Rnd 7: (Sc in next 5 sts, inc in next st) 6 times. (42)
- Rnd 8: (Sc in next 6 sts, inc in next st) 6 times. (48)
Do not fasten off. Secure the live loop while adding any gill embroidery.
Optional: Use a single strand of cream or tan yarn to embroider six straight lines from near the center toward Rnd 7. Keep the stitches relaxed so the panel stays flat.
Large cap spots, make 3
With the spot color, make an MR.
- Rnd 1: Work 6 sc in the MR. (6)
- Rnd 2: Inc in each st around. (12)
Sl st in the next st. Fasten off, leaving a tail for sewing.
Small cap spots, make 4
With the spot color, make an MR. Work 6 sc in the ring. Sl st in the first sc. (6)
Fasten off, leaving a tail for sewing.
Assembly and finishing
Add the cap spots
Pin the three large and four small spots across the dome, keeping them away from the final two rounds so they do not become trapped in the edge join. Sew around each spot with small, even stitches. Knot and bury the ends on the wrong side.
Close and stuff the cap
Place the gill panel against the open dome with wrong sides together and the 48-stitch edges aligned. Using the live cream loop, sc through both layers in each matched stitch. Pause after approximately 38 joining sc and add fiberfill in small pinches. Keep the gill panel mostly flat and place more filling near the dome center than the rim. Complete all 48 joining sc. Sl st in the first joining sc and fasten off.
Attach the arms
Pin one arm to each side of the stalk across Rnds 10-12. Angle the hands slightly forward. Sew through each 3-stitch flattened edge twice, checking that the attachment is firm before burying the tails inside the body.
Attach the cap
Center the body beneath the gill panel. Pin the top of the head to a circle around Rnds 3-5 of the gill panel. Using a long length of cream yarn, sew around the head-to-cap contact area with small stitches. Make a second pass for reinforcement. The cap should sit level without pulling the embroidered face upward.
Because this attachment has not been physically tested, check cap stability and head compression carefully during sampling. Adjust the attachment circle only after recording the change for the next pattern.
Troubleshooting
The mushroom tips over
First verify that the base has 24 stitches and Rnd 5 was worked in the back loops only. Keep the lower body firmly but evenly stuffed and avoid overstuffing the cap rim. Cap weight and balance require physical testing before this pattern is promoted as tested.
The gill panel cups
Recount each increase round. Every gill round after Rnd 1 adds exactly 6 stitches. A smaller hook may also help if loose gauge is causing the panel to stretch.
The cap edge puckers during joining
Match one dome stitch to one gill stitch for all 48 pairs. Do not skip stitches or force extra stitches into the join.
The neck looks thin
The neck is intentionally 18 stitches across Rnds 11-13. If it bends under the cap, review stuffing density and cap weight during testing rather than adding hidden wire.
Variations to test
- Try a russet cap with cream spots for a woodland palette.
- Embroider tiny stars instead of attaching crocheted spots.
- Add a removable scarf for an adult display piece, but avoid loose accessories on a child’s toy.
- Use two cap colors in broad stripes, changing colors only at the back of the piece.
- Make a family by testing the same stitch counts in different yarn weights; treat each yarn-and-hook combination as a separate size sample.
Care and safety
Follow the selected yarn’s care label. Until a sample is tested, hand washing in cool water and flat drying are the conservative choices. Do not iron or machine dry without fiber-specific confirmation. Before every use, inspect the cap seam, cap-to-head attachment, arms, spots, and embroidery. An adult should supervise children with any handmade toy.
Keep making
Find more characters in Dolls & Fantasy or browse the full Amigurumi Magic category guide.
Original-use and copyright note
This is an original Amigurumi Magic pattern written for AmigurumiMagic.com under the Nina Lojank fictional pen-name persona. It was developed independently and is not based on another publisher’s mushroom instructions. Do not republish, translate, sell, or distribute the written instructions or photographs. Finished handmade items may be sold in small quantities with design credit to AmigurumiMagic.com, subject to the final published pattern terms. Original project photography and its rights record are still pending. Report a suspected error through the Contact page so the correction date can be recorded.