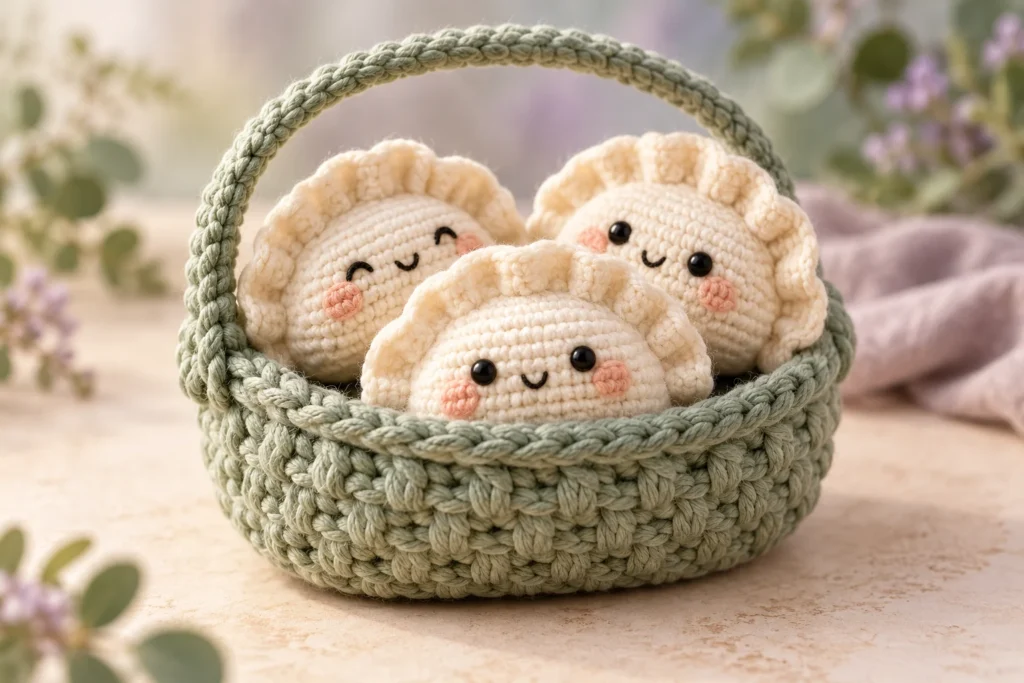
This original pattern pairs a plump pocket dumpling with a little carry basket. The dumpling begins as a flat circle, folds in half, and closes with a crocheted seam. The basket grows from its base to its handles without separate pieces. It is intended for confident beginners who already know how to work in continuous rounds.
Commercial disclosure: This article contains no affiliate links or sponsored recommendations.
In this pattern
- Project snapshot
- Materials, abbreviations, and special techniques
- Dumpling instructions
- Carry basket instructions
- Assembly, troubleshooting, variations, care, and usage terms
Project snapshot
- Skill level: Advanced beginner
- Terminology: US crochet terms
- Yarn: Medium-weight category 4 yarn
- Hook: 3.5 mm (E-4), subject to gauge testing
- Construction: One folded dumpling piece and one seamless basket
- Sewing: None for construction; the face is embroidered
- Working method: Continuous rounds unless a section says otherwise
- Estimated time: Varies by crocheting pace
- Finished size: Varies by yarn, hook, stuffing, and personal tension
- Gauge: Use a dense fabric that does not reveal stuffing
Materials and tools
- Medium-weight category 4 yarn in cream for the dumpling
- Medium-weight category 4 yarn in a basket color
- Small amounts of black and pink yarn or embroidery floss for the face
- 3.5 mm (E-4) crochet hook, or the size needed for a firm fabric
- Polyester fiberfill
- Locking stitch marker
- Yarn needle
- Scissors
- Optional removable markers for pairing the dumpling edge
Quantities are intentionally omitted until a sample has been made and weighed. Choose smooth, tightly spun yarn for the first test so the stitches and shaping are easy to inspect.
Abbreviations
- ch: chain
- BLO: back loop only
- dec: invisible single crochet decrease over the next 2 stitches
- inc: work 2 single crochet stitches in the next stitch
- MR: magic ring
- rnd: round
- sc: single crochet
- sl st: slip stitch
- st/sts: stitch/stitches
Special techniques
Invisible decrease
Insert the hook through the front loop of each of the next 2 stitches. Yarn over and pull through the first 2 loops, then yarn over and pull through both loops on the hook. One decrease uses 2 stitches and produces 1 stitch.
Crocheted fold seam
Fold the circle so the first half of the final round aligns with the second half. Insert the hook through one stitch on the front layer and its matching stitch on the back layer, then complete 1 sc. Each join consumes a pair of edge stitches and produces one raised seam stitch.
Before you begin
Place a marker in the first stitch and move it up after every round. Do not join continuous rounds unless instructed. Count at the end of every round; the number in parentheses is the total number of stitches after that round.
Embroider the face before stuffing. For an item intended for a young child, do not substitute safety eyes, buttons, beads, wire, pellets, or other detachable parts. Always supervise children around handmade toys and inspect the item regularly for loose yarn or damaged seams.
Instructions
Dumpling
With cream yarn, make an MR.
- Rnd 1: Work 6 sc in the MR. (6)
- Rnd 2: Inc in each st around. (12)
- Rnd 3: (Sc in next st, inc in next st) 6 times. (18)
- Rnd 4: (Sc in next 2 sts, inc in next st) 6 times. (24)
- Rnd 5: (Sc in next 3 sts, inc in next st) 6 times. (30)
- Rnd 6: (Sc in next 4 sts, inc in next st) 6 times. (36)
Do not fasten off. Flatten the circle and choose one half for the face. With black yarn, embroider two small closed eyes between Rnds 3 and 4. Space them evenly around the center of that half. Add a tiny curved mouth and optional pink cheek stitches. Secure all embroidery ends on the wrong side.
Fold the circle in half with the face on the outside. Align stitch 1 with stitch 36, stitch 2 with stitch 35, and continue pairing inward until stitch 18 aligns with stitch 19. Move the working loop to one end of the fold without twisting the fabric.
Working through both aligned layers, make 1 sc in each paired set. Pause after 13 seam stitches and add fiberfill a little at a time, keeping it away from the live edge. Work the final 5 seam stitches. (18 joining sc)
Fasten off and weave in the end. Massage the filling away from the seam so the dumpling has a softly rounded belly and a crisp top ridge.
Carry basket
With the basket color, make an MR.
- Rnd 1: Work 6 sc in the MR. (6)
- Rnd 2: Inc in each st around. (12)
- Rnd 3: (Sc in next st, inc in next st) 6 times. (18)
- Rnd 4: (Sc in next 2 sts, inc in next st) 6 times. (24)
- Rnd 5: BLO sc in each st around. (24)
- Rnds 6-10: Sc in each st around. (24 each rnd)
- Rnd 11: Sc in next 5 sts, ch 8, skip next 3 sts, sc in next 9 sts, ch 8, skip next 3 sts, sc in final 4 sts. (18 sc and 16 ch; 34 working loops)
- Rnd 12: Sc in each sc and in each ch around. (34)
Sl st in the next st and fasten off. Weave in the end securely. The two chain spans form the basket handles; do not count the skipped body stitches as live stitches after Rnd 11.
Assembly and finishing
No construction sewing is required. Place the dumpling into the basket after both pieces have been shaped. Because the sample has not been made, the fit is provisional. A tester should confirm whether the basket needs one fewer or one additional plain body round before the handle round.
Gently flatten the basket base. If it cups outward, relax the piece with your hands rather than applying heat. Acrylic yarn can be damaged by high temperatures.
Troubleshooting
The dumpling edge does not line up
Confirm that Rnd 6 has exactly 36 stitches. Place markers in stitches 1, 18, 19, and 36 before folding. There should be 18 paired sets along the fold.
The filling shows through
Change to a smaller hook or loosen the amount of stuffing. A hook that is too large can create gaps even when the stitch count is correct.
One basket handle is off-center
Recount Rnd 10 before beginning the handle round. Rnd 11 consumes all 24 body stitches: 5 worked, 3 skipped, 9 worked, 3 skipped, and 4 worked.
The basket will not sit flat
Check that Rnd 5 was worked in the back loops only. That unused front-loop ridge creates the turn between the flat base and upright wall.
Variations to test
- Add sesame-seed embroidery with short tan stitches before folding the dumpling.
- Work the basket in two alternating colors, changing yarn at the start of a round.
- Make a savory face with straight eyebrows or a sleepy version with curved eyes.
- Test a drawstring variation only as a decorative adult collectible; loose cords are unsuitable for young children.
Record every variation separately during testing because color changes, textured yarn, and embroidery can affect handling and finishing.
Care and safety
Hand wash gently in cool water with mild detergent, reshape, and dry flat only after the selected yarn’s care label has been checked. Do not iron or expose synthetic filling to high heat. Embroidered features are recommended for a child-directed item, but an adult should still inspect the seam and embroidery before every use.
Keep making
Browse more No-Sew Projects or visit the Amigurumi Magic category guide while this pattern is being tested.
Original-use and copyright note
This is an original Amigurumi Magic pattern written for AmigurumiMagic.com under the Nina Lojank fictional pen-name persona. It was developed independently and is not adapted from another designer’s pattern. Do not republish, translate, sell, or distribute the written instructions or photographs. Finished handmade items may be sold in small quantities with design credit to AmigurumiMagic.com, subject to the final published pattern terms. Original project photography and its rights record are still pending. Report a suspected error through the Contact page so the correction date can be recorded.