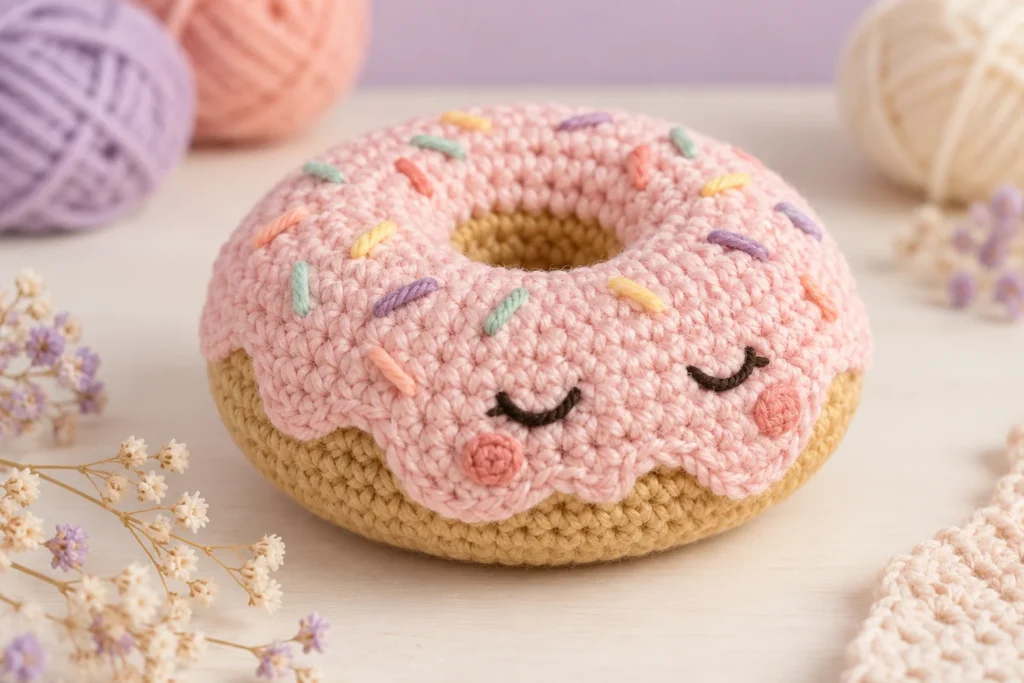
This shy little donut hides behind a soft frosting ring, with sleepy embroidered eyes and rosy cheeks. The top and bottom are worked outward from open center rings, joined around the hole, stuffed, and crocheted together at the outer edge. Only the inner seam uses a yarn needle, which makes this an original low-sew project for an advanced beginner.
Commercial disclosure: This article contains no affiliate links or sponsored recommendations.
In this pattern
- Project snapshot
- Materials, abbreviations, and special techniques
- Frosted top and dough bottom instructions
- Inner and outer joining instructions
- Troubleshooting, variations, care, and usage terms
Project snapshot
- Skill level: Advanced beginner
- Terminology: US crochet terms
- Yarn: Medium-weight category 4 yarn
- Hook: 3.5 mm (E-4), subject to gauge testing
- Construction: Two flat rings joined into a stuffed torus
- Sewing: One 18-stitch inner seam; face and sprinkles are embroidered
- Working method: Joined rounds for both panels
- Estimated time: Varies by crocheting pace
- Finished size: Varies by yarn, hook, stuffing, and personal tension
- Gauge: Match the top and bottom panels consistently; a specific gauge is less important than an even fabric
Materials and tools
- Medium-weight category 4 yarn in a dough color
- Medium-weight category 4 yarn in a frosting color
- Small amounts of black, pink, and several sprinkle colors
- 3.5 mm (E-4) crochet hook, or the size needed for a firm fabric
- Polyester fiberfill
- Locking stitch marker
- Yarn needle
- Scissors
Yardage is not listed because no sample has been weighed. Use the same yarn line and hook for both panels so their edges match.
Abbreviations
- ch: chain
- inc: work 2 single crochet stitches in the next stitch
- rnd: round
- sc: single crochet
- sl st: slip stitch
- st/sts: stitch/stitches
Special techniques
Joined rounds
At the end of each round, sl st in the first sc to join, then ch 1. The joining slip stitch and beginning chain do not count as stitches. Work the first sc of the new round into the same stitch that received the joining slip stitch.
Crocheted outer join
Hold the panels with wrong sides together. Insert the hook through the next stitch of both panels, yarn over, pull through both layers, and complete 1 sc. Each joining sc consumes one stitch from each panel.
Before you begin
Both panels begin with a chain ring rather than a magic ring because the donut needs an open center. Work the first round into the chain stitches, not around the chain ring. When possible, work into the back bump of each foundation chain so two loops remain available for the inner seam.
Count each joined round before proceeding. The top and bottom must each end with 54 stitches. Embroider the face and sprinkles before joining the panels so all yarn ends can be secured inside.
This design uses embroidered details instead of plastic eyes. That reduces detachable parts but does not make a handmade item automatically safe for a child. Supervise play and inspect the inner and outer seams regularly.
Instructions
Frosted top panel
With frosting color, ch 18 loosely. Taking care not to twist the chain, sl st in the first ch to form a ring.
- Rnd 1: Sc in each ch around; join. (18)
- Rnd 2: (Sc in next 2 sts, inc in next st) 6 times; join. (24)
- Rnd 3: (Sc in next 3 sts, inc in next st) 6 times; join. (30)
- Rnd 4: (Sc in next 4 sts, inc in next st) 6 times; join. (36)
- Rnd 5: (Sc in next 5 sts, inc in next st) 6 times; join. (42)
- Rnd 6: (Sc in next 6 sts, inc in next st) 6 times; join. (48)
- Rnd 7: (Sc in next 7 sts, inc in next st) 6 times; join. (54)
Change to dough color.
- Rnd 8: Sc in each st around; join. (54)
Fasten off and weave the end toward the wrong side.
Embroidered face and sprinkles
Choose a 12-stitch-wide section of the frosting as the front. Embroider two small downward-curving eyes across Rnds 3 and 4, leaving about 4 stitches between their nearest points. Add one short pink stitch beneath the outside of each eye. Distribute short straight sprinkle stitches across the remaining frosting, keeping all details inside Rnd 6 so they do not disappear into the outer join.
Secure the embroidery firmly on the wrong side without pulling hard enough to pucker the panel.
Dough bottom panel
With dough color, ch 18 loosely. Join without twisting.
- Rnd 1: Sc in each ch around; join. (18)
- Rnd 2: (Sc in next 2 sts, inc in next st) 6 times; join. (24)
- Rnd 3: (Sc in next 3 sts, inc in next st) 6 times; join. (30)
- Rnd 4: (Sc in next 4 sts, inc in next st) 6 times; join. (36)
- Rnd 5: (Sc in next 5 sts, inc in next st) 6 times; join. (42)
- Rnd 6: (Sc in next 6 sts, inc in next st) 6 times; join. (48)
- Rnd 7: (Sc in next 7 sts, inc in next st) 6 times; join. (54)
- Rnd 8: Sc in each st around; join. (54)
Do not fasten off. Keep the working loop secure while joining the centers.
Assembly and finishing
Join the center hole
Place the panels wrong sides together with their center holes aligned. Thread a yarn needle with a separate length of dough-colored yarn. Using the unworked loops along each foundation-chain ring, whip stitch the two center openings together. Make exactly 18 evenly spaced joining stitches, matching one foundation chain on the top to one on the bottom. Knot securely inside and trim the yarn end.
Join and stuff the outer edge
Return to the live loop on the bottom panel. With the top panel facing you, insert the hook through the next stitch on both outer edges. Work 1 sc through both layers in each matched stitch. (54 joining sc total)
After approximately 42 joining sc, pause and add small pinches of fiberfill around the ring. Keep the center hole open and distribute the filling evenly. Continue joining, adjusting the filling before the last 4 stitches. Complete all 54 joining sc, sl st in the first joining sc, and fasten off.
Weave in the end through the dough-colored edge. Roll the donut gently between your hands to even the filling without flattening the center hole.
Troubleshooting
The panels ripple before assembly
A slight wave may relax after stuffing, but strong rippling can indicate loose gauge or an incorrect stitch count. Verify that each round increases by exactly 6 stitches and that each panel ends with 54.
The center hole closes after stuffing
Remove some filling near the inner seam and move it toward the outer edge. Stuffing should form a ring rather than a solid disk.
The outer edges do not match
Stop and recount both Rnd 8 edges. Do not skip or double up stitches to hide a mismatch, because that can twist the finished donut.
The face puckers
The embroidery tension is too tight. Remove the affected strand and rework it so it rests on the surface without compressing the crochet fabric.
Variations to test
- Use cream frosting with berry-colored sprinkles for a bakery-box look.
- Embroider tiny eyebrows tilted toward the center to make the donut look extra shy.
- Add surface slip stitches inside Rnd 6 for a frosting swirl, checking that the extra yarn does not stiffen the top.
- Test thinner yarn with a correspondingly smaller hook for a keychain-size collectible, but attach hardware only for adult use.
Each version needs its own physical safety and construction review before this pattern is promoted as tested.
Care and safety
After confirming the yarn label, hand wash gently in cool water, press out water without twisting, reshape the center opening, and dry flat. Avoid high heat. Check the 18-stitch inner seam, the 54-stitch outer join, and all embroidery before giving the item to a child. Adult supervision remains necessary.
Keep making
Explore more No-Sew Projects or browse every project in the Amigurumi Magic category guide.
Original-use and copyright note
This is an original Amigurumi Magic pattern written for AmigurumiMagic.com under the Nina Lojank fictional pen-name persona. It was developed independently and is not a reproduction or adaptation of another publisher’s donut pattern. Do not republish, translate, sell, or distribute the written instructions or photographs. Finished handmade items may be sold in small quantities with design credit to AmigurumiMagic.com, subject to the final published pattern terms. Original project photography and its rights record are still pending. Report a suspected error through the Contact page so the correction date can be recorded.